How to Tape an Ankle: Step-by-Step Guide for Injury Prevention & Support
Whether you’re an athlete, a weekend warrior, or recovering from an injury, knowing how to tape an ankle can make a huge difference in both performance and recovery. Ankle sprains are among the most common injuries in sports, and proper taping techniques help provide stability, reduce swelling, and prevent further damage. In this blog, we’ll walk you through the complete process, from preparation to finishing touches.
🧾 Why Learn How to Tape an Ankle?
Taping is one of the fastest and most effective ways to support the ankle joint. Whether you’re dealing with a minor sprain or want to avoid one altogether, learning how to tape an ankle ensures better mobility and peace of mind. Many physios and sports trainers recommend taping as part of a preventive routine for high-impact sports like basketball, soccer, or running.
📦 What You’ll Need:
Before we dive into the process, gather the following:
- Athletic or sports tape (preferably non-stretch, rigid tape)
- Pre-wrap (optional but recommended)
- Scissors
- Clean, dry skin
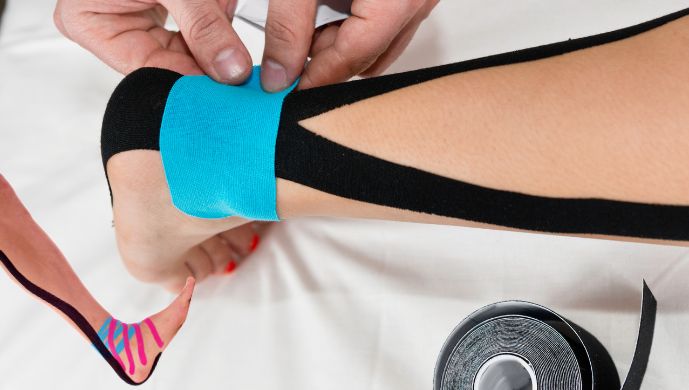
🩹 Step-by-Step: How to Tape an Ankle
1. Position the Foot
Ensure the foot is at a 90-degree angle. The person should be seated or lying down with the foot slightly flexed upward.
2. Apply Pre-Wrap (Optional)
Wrap a thin layer of pre-wrap around the ankle and foot, starting above the ankle and working downward toward the arch. This prevents tape irritation and makes removal easier.
3. Anchor Strips
Place two anchor strips: one above the ankle and one around the arch of the foot. These act as a base for all following tape patterns.
4. Stirrups
Apply 2–3 stirrup strips from the medial side of the ankle (inside) under the heel and up the lateral side (outside). This locks the ankle and adds vertical support.
5. Figure-8 Pattern
Wrap the tape in a figure-8 motion starting at the arch, going over the foot, behind the ankle, and back under the foot. This reinforces movement limitation.
6. Heel Locks
Place 2–3 heel locks starting behind the ankle, wrapping over the foot and under the heel in an X-pattern. These add lateral stability and prevent the foot from rolling.
7. Close It Off
Use finishing strips around the ankle and arch to secure everything in place and tidy up loose ends.
And there you have it — a professional-level guide on how to tape an ankle for stability, injury prevention, and recovery.
🚨 Tips for Best Results:
- Don’t tape over open wounds or broken skin
- Avoid taping too tightly — it should be firm, not restrictive
- Remove tape after activity to allow proper circulation
- Seek medical advice if swelling, numbness, or pain increases
🏷 Where to Buy Quality Sports Tapes?
At Sands Industries, we provide high-performance sports tapes designed for professional use. Whether you’re a physio clinic, gym, or sporting team, our tapes offer premium adhesion, breathability, and easy application.
💬 Want a custom branded sports tape for your clinic or club? Talk to our team today!
📌 Final Thoughts: How to Tape an Ankle Like a Pro
Knowing how to tape an ankle is an essential skill for athletes, coaches, and caregivers. It’s a simple technique that can prevent injuries, speed up recovery, and give users the confidence to return to movement. With the right tape and proper method, you’ll master how to tape an ankle quickly and effectively.
Sports Tapes & Athletic Use – FAQs
❓ How to tape an ankle?
Taping an ankle involves wrapping athletic tape around the foot and lower leg to provide support, reduce movement, and prevent sprains. Read our full guide on how to tape an ankle.
❓ How often should you tape a hockey stick?
Most players re-tape their hockey stick every game or practice, depending on how often they play and personal preference.
❓ How to tape a sprained ankle?
Start with pre-wrap for comfort, then use rigid athletic tape to create anchor strips, stirrups, figure-8s, and heel locks for full support. Always consult a professional for injuries.
❓ How to tape shin splints?
Use kinesiology or athletic tape to create a supportive X-pattern over the shin. This helps reduce pain and provide support during physical activity.
❓ How to tape foot for plantar fasciitis?
Apply athletic tape in a low-dye pattern starting from the ball of the foot and wrapping around the arch to reduce strain on the plantar fascia.
❓ How often should you reapply tape in sports?
Reapply tape daily or before each activity to ensure consistent support. For injuries, follow your physiotherapist’s or trainer’s guidance.
❓ How long does sports tape last during activity?
High-quality sports tape can last for several hours of physical activity but may wear off faster in water or excessive sweat.
❓ Will tape stick to fabric or sports gear?
Not all tapes are designed to stick to fabric. For gear or clothing, use fabric-specific tapes or secure with elastic straps.
❓ What tape is best for athletes?
Rigid athletic tape is best for joint stabilization, while kinesiology tape is great for muscle support and improved circulation.
❓ How often should you tape in extensions move up?
This question relates to hair extensions rather than sports. However, for athletes wearing extensions, tape-ins may require reapplication every 6–8 weeks.